Greenhouse Temperature Sensor
TL;DR: Build a low-power ESP32-C3 temperature and humidity sensor for your greenhouse using a BME280, integrated with Home Assistant via ESPHome.
Disclosure: Some links on this page are affiliate links. If you purchase through these links, I may earn a small commission at no extra cost to you.
Greenhouse Temperature Sensor Prerequisites
- Seeed Studio ESP32-C3 microcontroller
- BME280 sensor (GY-BME280-3.3 variant)
- Dupont cables for prototyping
- Home Assistant with ESPHome add-on installed
- Soldering iron (for final assembly)
- 3D printer (optional, for case)
My next project is going to be setting up a new greenhouse. I ordered the popular Costco Yardistry 8×10 Greenhouse while it was still on sale this winter. I’m hoping to get it setup as early as the weather let’s me. Of course, the greenhouse will have to be as smart as possible.
Step 1 for my smarter greenhouse will be to get temperature and humidity readings. I wanted a small low power ESPHome device that could communicate back to Home Assistant. With this information I can eventually automate vent and circulation fans, opening closing the exhaust window, and more. I purchased a Seeed Studio ESP32-C3 micro-controller with Bluetooth and WiFi, and a BME280 temperature and humidity sensor. If you’re not already familiar with setting up a new ESP device in Home Assistant, I recommend following Seeed Studio’s guide. Next, the BME280 needs to be connected to the ESP32-C3. I connected mine as follows:
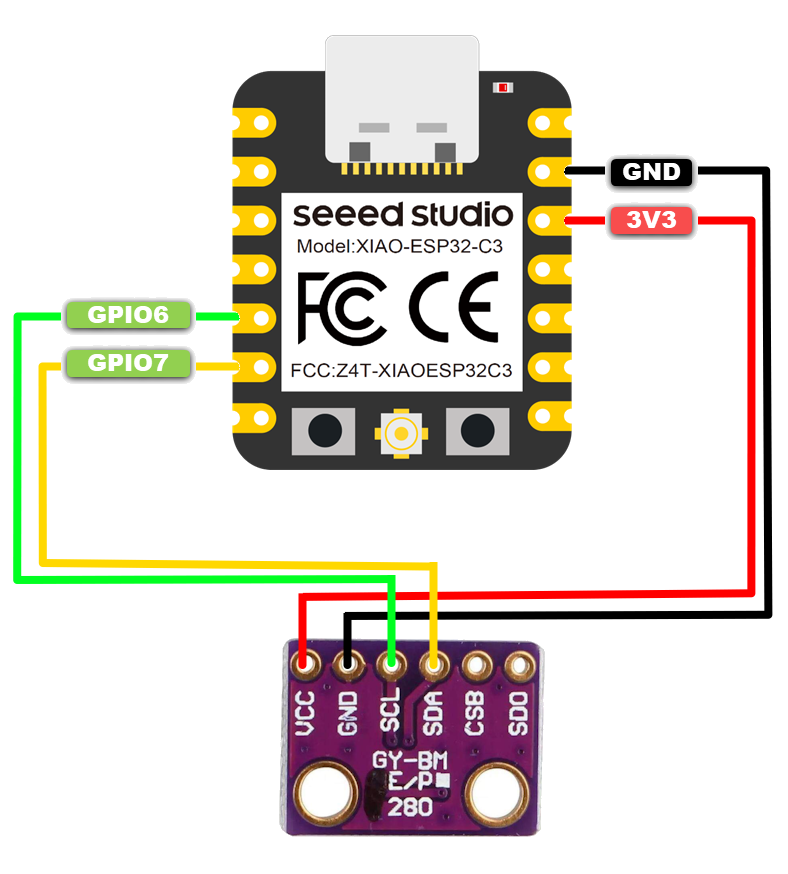
| BME280 | ESP32-C3 |
| VCC | 3.3V |
| GND | GND |
| SCL | GPIO06 |
| SDA | GPIO07 |
Then add the BME GPIO config to the bottom of the existing ESP32-C3 configuration yaml:
i2c:
  sda: GPIO07
  scl: GPIO06
  scan: true
  id: bus_a

sensor:
  - platform: bme280_i2c
    temperature:
      name: "Temperature"
      oversampling: 16x
    pressure:
      name: "Pressure"
    humidity:
      name: "Humidity"
    update_interval: 60s
    i2c_id: bus_a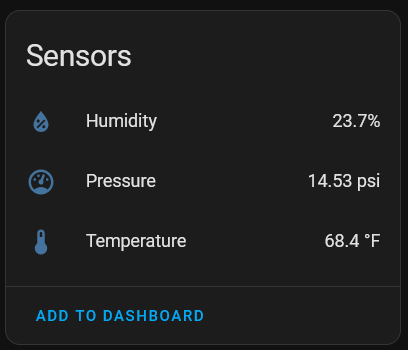
address: 0x76This added 3 sensors to the device in Home Assistant:
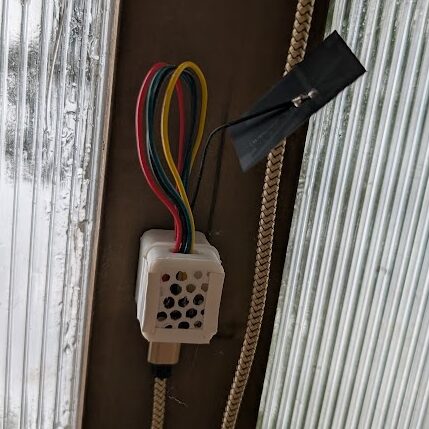
For prototyping this was all setup using Dupont cables. Once successfully tested I printed this case for the ESP32C3, soldered everything together, and hung this in my greenhouse – more or less in the shade.
I also setup a small solar system for the greenhouse so I don’t have to run power to it.
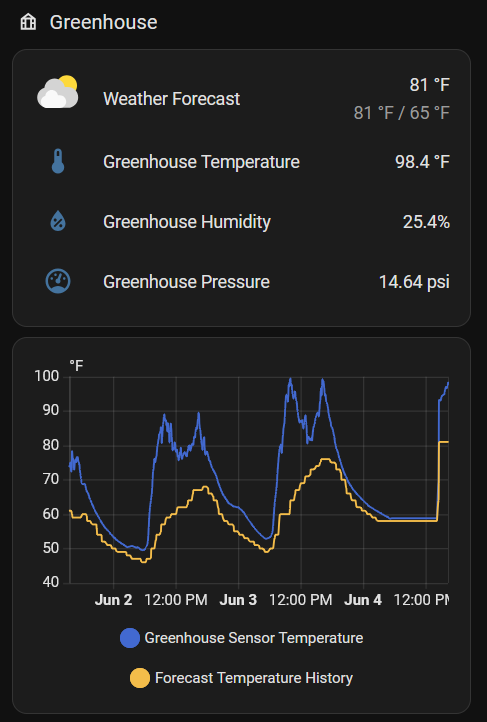
This is now all monitored in my Greenhouse Dashboard:
Greenhouse Temperature Sensor System Overview
Your setup will now:
- ✅ Monitor temperature, humidity, and pressure in your greenhouse
- ✅ Send readings to Home Assistant every 60 seconds
- ✅ Run on low power via solar (no wiring needed)
- ✅ Display data on your Greenhouse Dashboard
- ✅ Enable future automations for vents, fans, and windows
Useful Links:
GitHub Config Files – Sanitized configuration files from this tutorial
Seeed Studio XIAO ESP32C3 Guide – Getting started with the microcontroller
ESPHome BME280 Sensor – BME280 configuration reference
ESP32-C3 Case – 3D printable case design
Hardware:
Seeed Studio ESP32-C3 XIAO: Seeed Studio, Amazon
BME280 Sensor (GY-BME280-3.3): AliExpress, Amazon
Dupont Cables: AliExpress
Costco Yardistry 8×10 Greenhouse: Costco
Related Posts:
Greenhouse Solar Monitoring – Power your greenhouse with solar